 Learning how to replace a chainsaw chain is a critical part of owning a chainsaw. At some point in time, your chain is going to need a replacement. The teeth on your chain will eventually get dull from cutting through so much wood, and there is only so much sharpening you can do.
When sharpening isn’t enough, and your chain is worn and dull, it is time for a replacement. If you are unsure what kind of chain you have on your chainsaw, you can generally discover this information printed on the base of the chainsaw guide bar. There will be numbers stamped that correlate to the size of your chainsaw bar and your chainsaw chain.
If you write these numbers down and go to your local hardware store, they will be able to give you the proper chain for your chainsaw. On the off chance that these numbers are worn out completely and you do not know what size of chain you have, you need to do some measuring.
Determining the Proper Replacement Chain
To determine the size of your chain, there are three quick measurements to take.
You first need to measure the gauge, which is simply the width of the groove where the chain fits inside the guide bar. You can do this with a pair of calipers. Take your calipers and measure the thickness of the drive links, which are the small metal pieces that fit into the groove on the guide bar. The normal size is .050”.
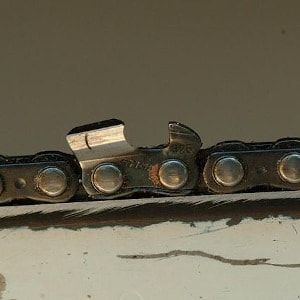
Then you can measure the pitch, which is the exact distance between each of the drive links. Find 3 rivets on the chain, the small circles that hold each drive link together, and measure between them. The exact length between three rivets divided by two will equal the pitch of your chainsaw chain.
Finally, count the drive links. You literally just need to count each drive link one by one to get the full measurement of the chain length. With these three numbers, you can now go to the hardware store and pick up a new replacement chain for your chainsaw.
Read More: How To Put A Chain On A Chainsaw – Easy 3 Steps Guide
Putting the Chainsaw Chain on the Right Way
Before you put the chain back onto your chainsaw, you need to make sure it faces the right way. If you put your chain on backward, it is not going to do you much good cutting. You will be trying to chop through wood with the wrong side of the teeth. Obviously, this is no good for anyone.
When putting your chain onto the guide bar, make sure the teeth are pointing forward. Forward means pointing at the end of the bar. On the top side of the bar, your teeth should be pointing at the tip of the guide bar turning in a clockwise motion. On the bottom side of the bar, your teeth will be pointing at the body of the chainsaw.
Now that you have your chain positioned the right way, it is time to put it on. Remember that all chainsaws are a little different, and so not everything is going to work the same – but the following instructions are fairly universal and should work with just about any chainsaw.
Read More: Chainsaw Chain Direction – How To Put It The Right Way
How To Replace A Chainsaw Chain
Step 1: Open the Chainsaw
First, you need to remove the old chain. To do this, you must open and remove the side panel. The side panel is generally held together using two nuts, and you can easily unscrew these nuts with a wrench and the side plate will pop right off.
Sometimes, the brake will still be activated, and so you’ll need to unlock the brake before you can remove the panel. Always make sure the brake is unlocked before changing the chain.
Step 2: Remove the Old Chain
Now that the side panel is off, you will be able to see the inside guts of the machine. To remove the old chain, you want to pull the guide bar up by the nose so that the chain is released from its tensioner. You should immediately see the chain sag since there is no more tension holding it taut.
With so much slack in the chain, you can easily take it off the guide bar and unfasten it from the clutch drum, which is the circular mechanism below the bar. With your old chainsaw chain fully removed, you can dispose of it however you see fit.
Step 3: Put the New Chain On
To make life a little easier for you, I suggest finding the tension screw and then greatly reducing the tension. The tensioning screw is typically next to the bar on the right side if you are staring down the length of the bar from the tip. It is a small screw and can easily be loosened with a screwdriver.
By loosening the tension screw, it will be quite a bit easier to put the new chain on. You can always fix the tension later.
With your chain facing the right direction, thread it carefully around the clutch drum so that the drive links are engaged inside the sprocket, and then continue to place the drive links inside of the groove on the bar of the chainsaw. You’ll probably notice the bottom is sagging, but you can fix that later by tightening the tension screw.
Read More: How To Tell When A Chainsaw Chain Is Worn Out
Finishing Touches
Now you need to fix the guide bar. Take it by the nose and pull it gently away from the chainsaw to make sure it is seated on the adjustment pin properly. The adjustment pin is at the base of the bar, near to the clutch drum. You will feel when the bar is properly aligned.
Now you can place the side panel back onto the chainsaw and lightly screw on the nuts – but don’t tighten them yet. First, make sure your chain has the proper tension by adjusting the tension screw on the side. Once your chain has the right tension, then you can tighten the nuts on the panel.
Congratulations, you have just installed a new chain on your chainsaw!
Read More: How To Sharpen A Chainsaw – Beginner’s Guide