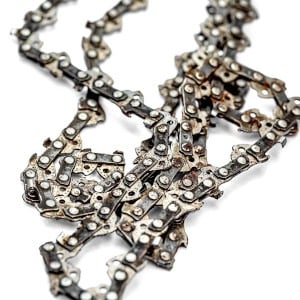
 Today we are talking about the chainsaw chain direction. If you are not an avid outdoors person who spends all their time working with chainsaws and other power tools, you are probably like the rest of us and have no idea what is going on with the direction of the chainsaw’s chain.
But today I have put together an awesome guide that will explain to you everything about the direction of a chainsaw chain. I understand it is confusing. We have all been there with this classic chainsaw blunder. As common of an issue as this is, it is even easier to master once you have figured out how to do it.
First is it important to learn how a chainsaw cuts.
How Does a Chainsaw’s Chain Work?
 Basically, if you have the chainsaw’s chain facing the wrong way, it is not going to cut anything. It would be like trying to cut with the dull edge of a knife. In fact, the safety of your chainsaw is directly impacted by having the chain on improperly, since the chainsaw blades are facing towards you. This is something you must get right.
A chainsaw works because there is a chain wrapped around its bar. The engine moves the chain extremely fast to cut through wood. But what actually cuts through the wood are the tiny little blades position evenly along the chain. These are also known as teeth.
The chain is equipped with little nubs that are super sharp and chew through wood like teeth. If the teeth don’t face the right way, they won’t work. Think about trying to use a hook backward, or trying to make gears function with their knobby parts facing the wrong way.
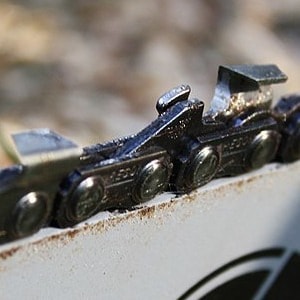
There are three critical clues that tell you which direction your chainsaw chain should face. When looking at the chain, you will see the cutter, or the tooth of the chain. This is sort of hooked and it is very clearly meant for chewing through wood. This faces forward.
Then there is the drive link. These are the small metal parts between links, and they come with a pointed edge that always points forward. And finally, the other jagged piece of metal sticking out above the cutter is called the guide, and it is a shorter piece that will be in front of the cutter. It faces backward.
Read More: How To Put A Chain On A Chainsaw – Easy 3 Steps Guide
How to Get the Chainsaw Chain Right
 If you were having some issues with your chainsaw not cutting, there is a big chance your chainsaw chain could be on the wrong way. To rectify this, simply follow these four easy steps and you will have your chainsaw biting through wood again in no time.
Step 1: The first thing you need is to get the chain off the bar. This means you need to remove the side casing so that you can access the bar and chain. This usually involves using a special tool and it should not take you more than a few moments.
Step 2: With the internal part open and the casing off and set aside, you now have a full view of the chainsaw bar and chain. You will see where the bar connects to the internal mechanism, and where the chain wraps around the internal spinning gear.
You need to take this apart so that the bar and chain both come off. Simply untighten where the chain is held in place and it will easily slip off. Once you have the bar and chain off, lay them flat on the ground.
Read More: How To Tell When A Chainsaw Chain Is Worn Out
Step 3: It is time to check the three clues we talked about earlier. The first one is the drive link. It must be facing forward, and by forward I mean in the direction of the end of the bar, away from the engine of the chainsaw. The drive link will be shaped like a wave, and it fits into special grooves on the chainsaw bar. Make sure the edge of the wave faces the end of the chainsaw.
The cutter should be facing the same direction. Like I said before, the cutter is the piece of metal on the chain that cuts the wood, and it looks like a cutter. There is no other way to describe it, and you will definitely know it when you see it.
Now ensure the guide is sitting where it is supposed to be in front of the cutter. This is not a blade. It is merely a guide that controls the amount of wood that gets cut by the cutter with each rotation. Basically, the guide controls how aggressively the chainsaw cuts the wood. It should be immediately at the front of the cutter.
Step 4: Once you understand which direction your chain needs to be, simply insert the guides into the blade so that it is ready to go. This is just like putting the chain on your bicycle. Make sure everything goes together properly, tighten it back into your chainsaw, put the casing back on, and close it, and you are ready to rock.
Read More: How To Tighten Chainsaw Chain – Beginner’s Guide
When Should I Replace My Chainsaw Chain?
This is probably the most frequented question about chainsaw chains. If you have been having trouble cutting, and your first assumption was that the chain was on wrong, chances are your chain is actually getting dull.
If you have to push the chain very hard to make a cut, the chain is dull. If your chainsaw is spewing out thin sawdust, it is getting dull. If the chain and bar begin to smoke even with the right amount of lubrication, your chain is getting dull. All of these factors signify a dull chainsaw, which means it is time to get a new one.
Additionally, you may notice your chainsaw is pulling in one direction, which is also evidence of a dull chain. If you do not replace your chain, you will have nothing but trouble down the line. I highly recommend you change your chain for a new one ASAP.
Read More: How To Replace A Chainsaw Chain – 3 Easy Steps